Skip to content

Accelerate Your Windows 11 Migration with Stratodesk NoTouch
Learn More

What is TCMGR and How do You Configure It?

What is TCMGR and How do You Configure It?

In my latest blog post, I’d like to explain the relevance of the term ‘TCMGR’. When configured correctly with auto assignment rules, TCMGR can greatly increase the level of automation when deploying Stratodesk NoTouch to your endpoints.

In short, TCMGR is the hostname of the Stratodesk virtual appliance and is an abbreviation of ‘Thin Client Manager’ which is used to manage Stratodesk NoTouch endpoints. It’s also the hostname that NoTouch endpoints are looking for during the first boot to find the management server. Once an endpoint has made contact with NoTouch Center, it will pick up its configuration & connection information that can then be used by the end user.

How to Configure TCMGR

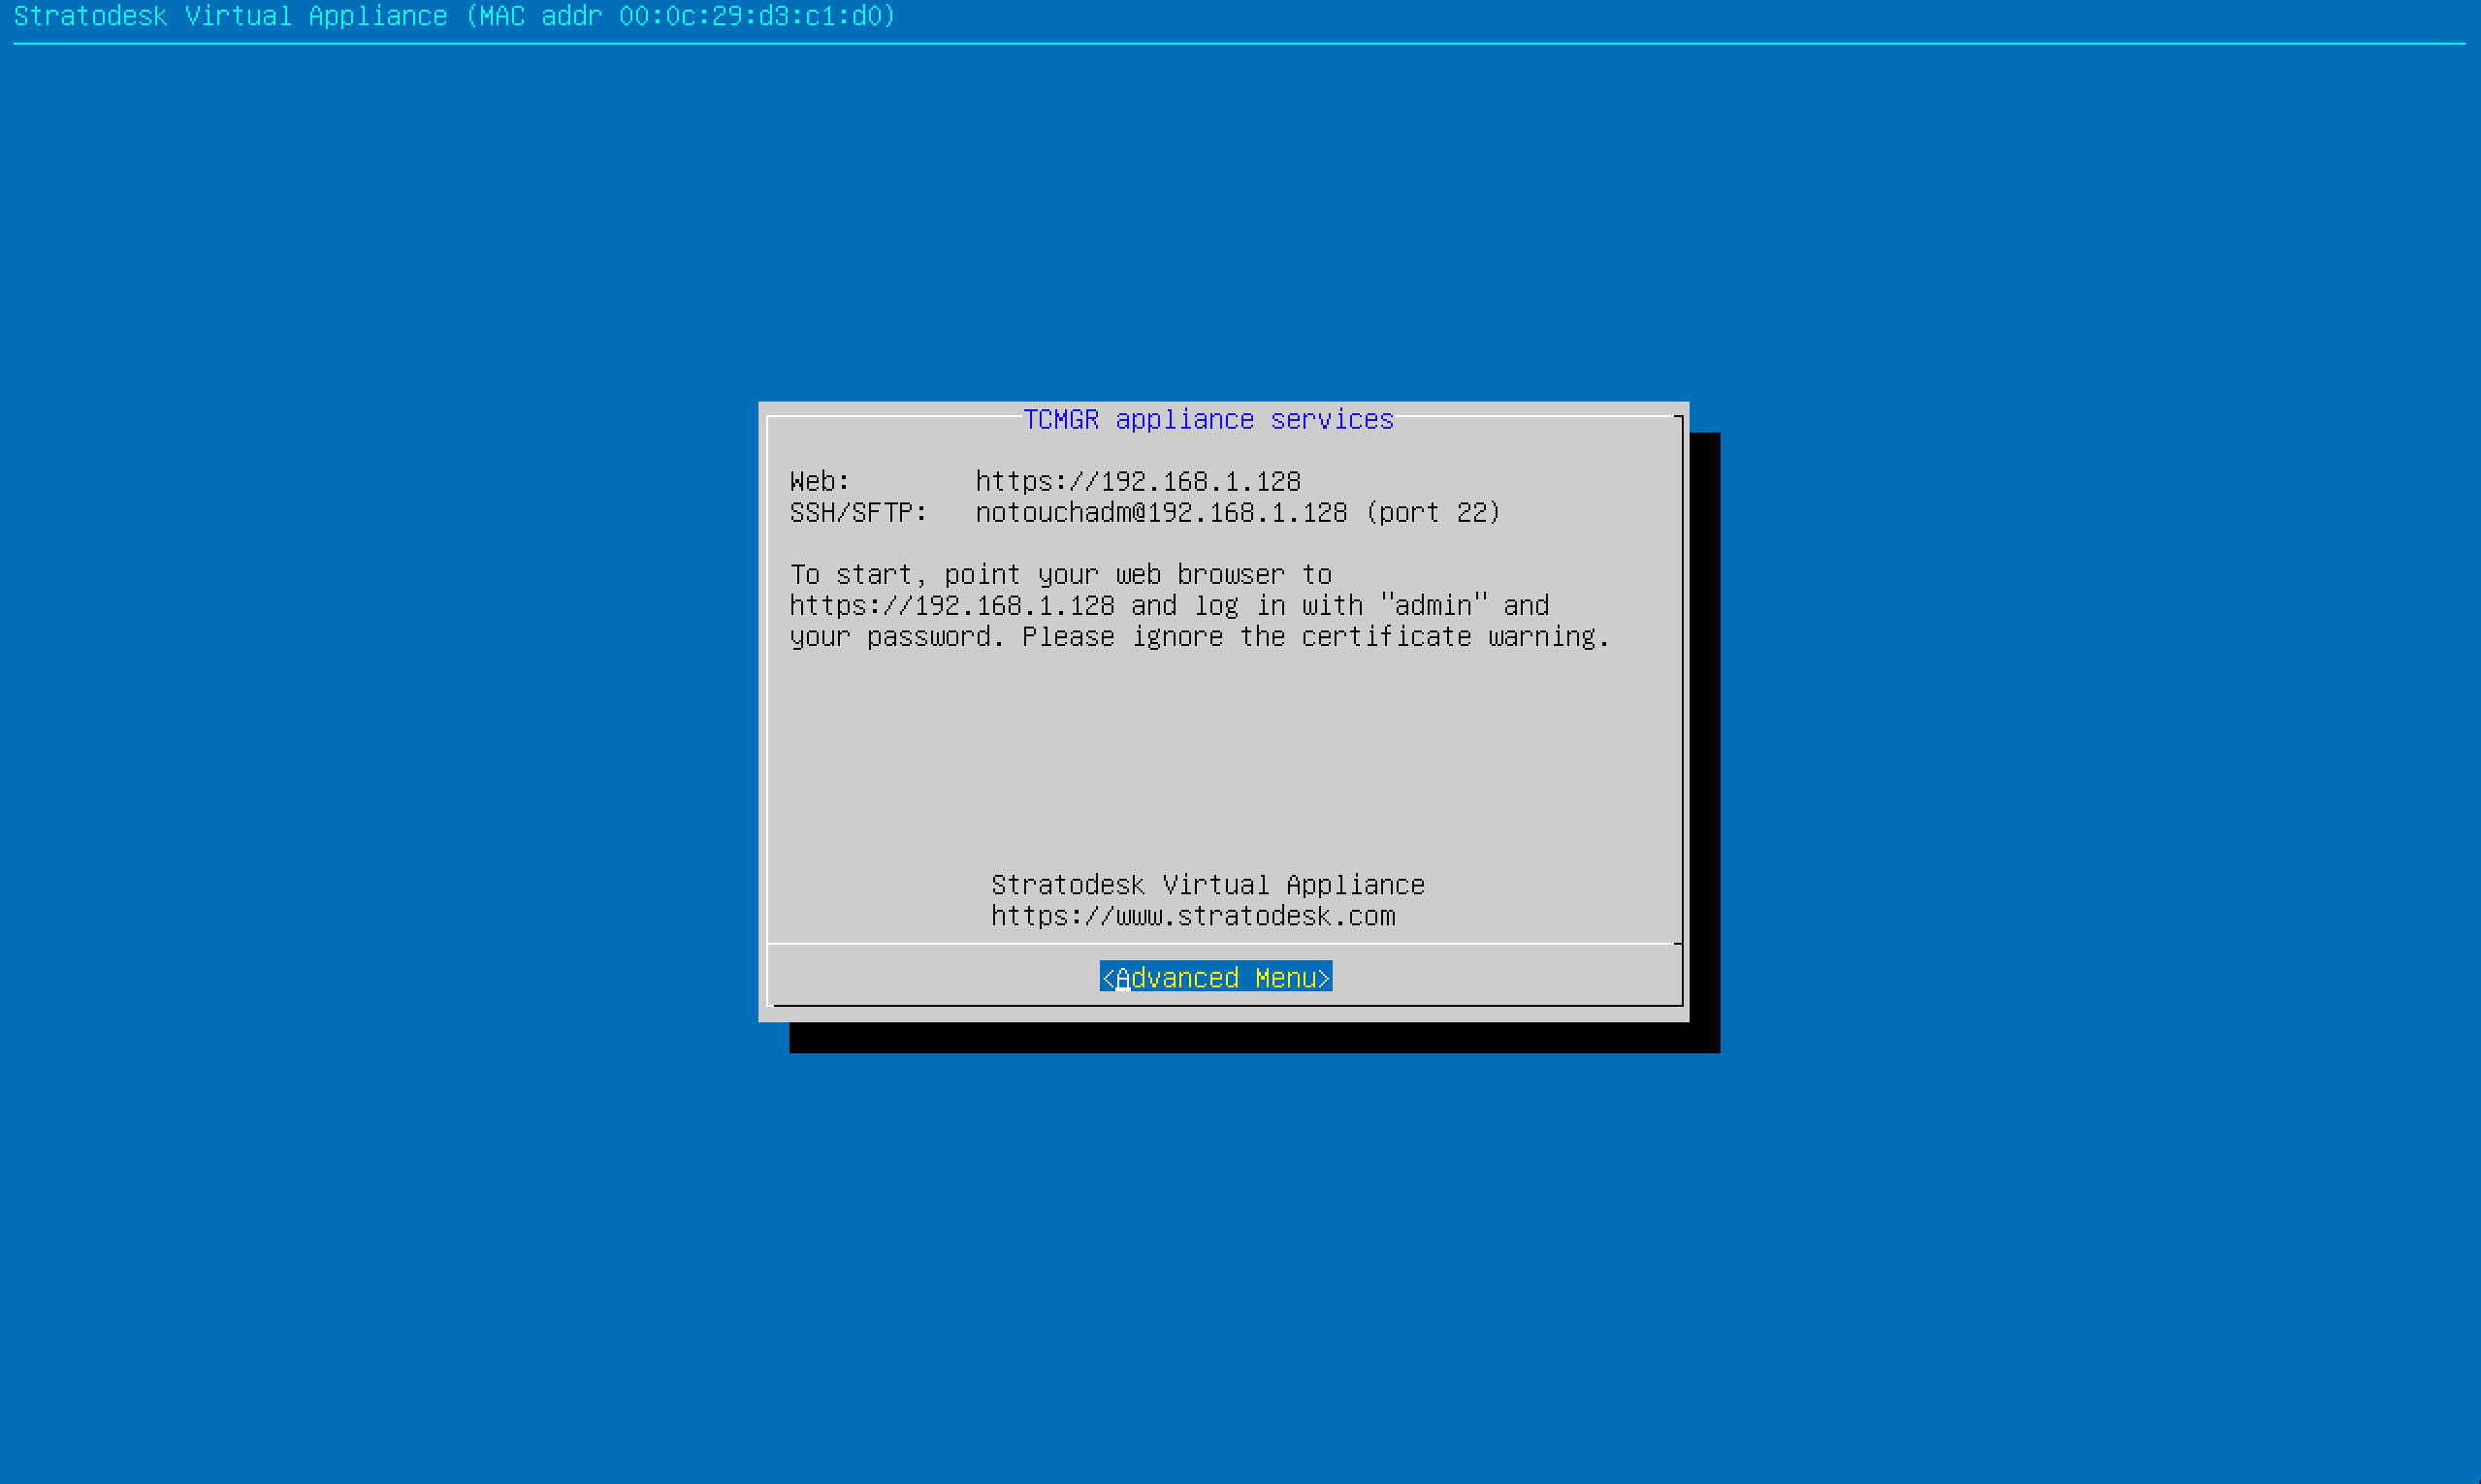
Firstly, you will need to download the virtual appliance and import it into your hypervisor of choice. Stratodesk NoTouch Center currently supports Hyper-V, VMware ESXi/vCenter, Citrix Hypervisor (formally XenServer) & Nutanix AHV.

When importing the NoTouch Center virtual appliance into your environment, you have the option of using either DHCP or using a static IP address. It’s important that you use a static IP address to avoid future discovery issues in the event that the DHCP lease expires and its IP address changes.

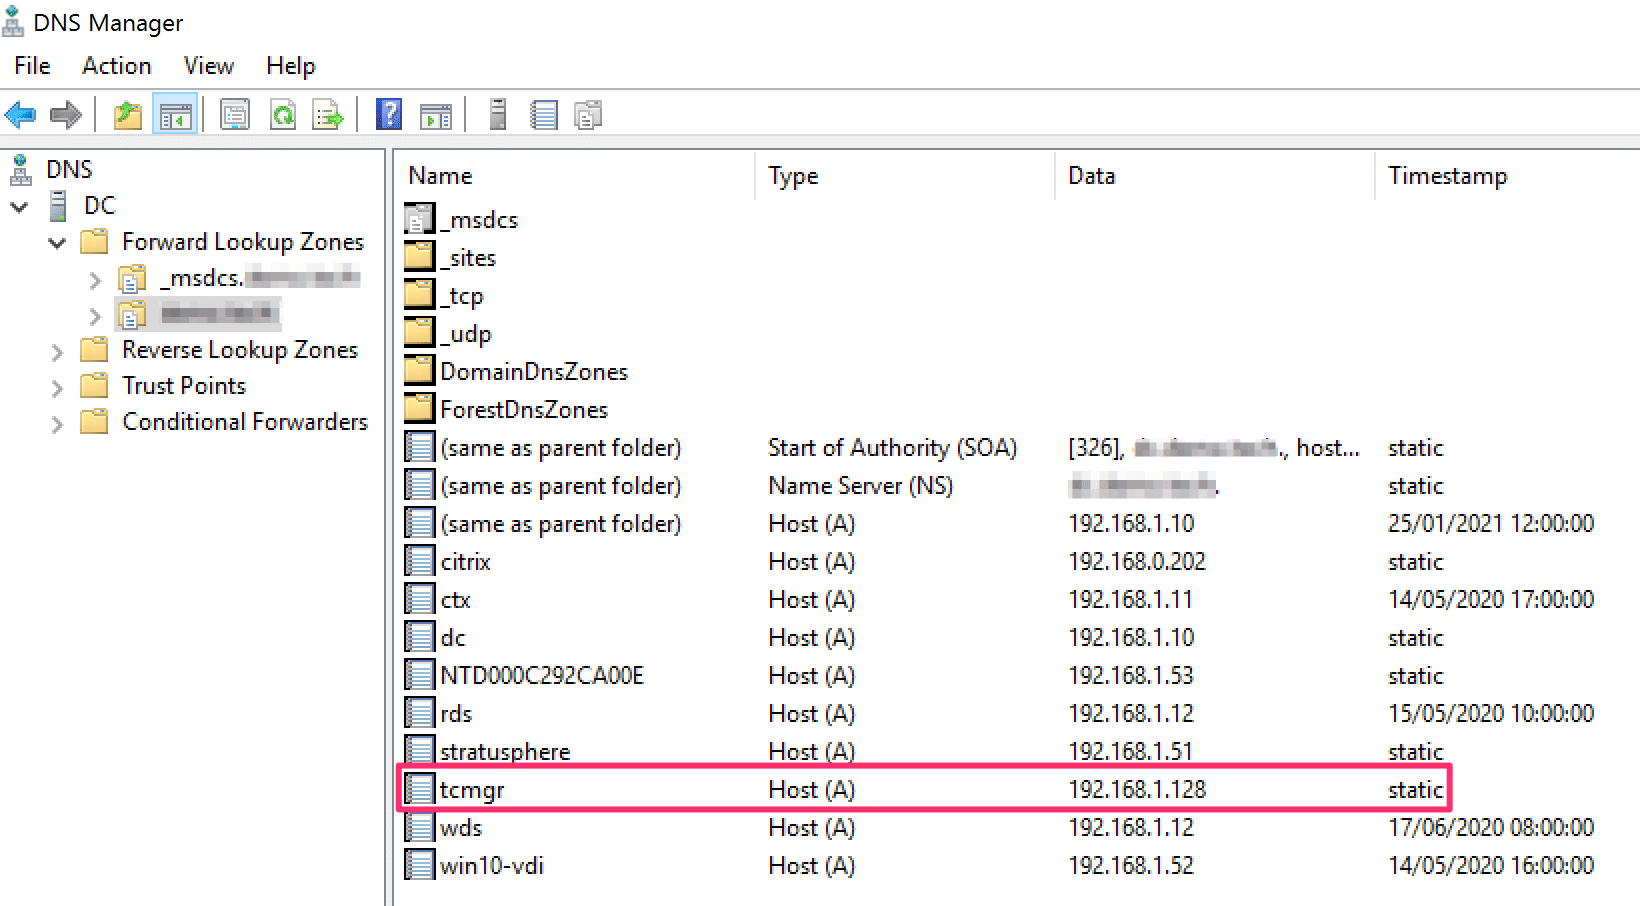
Second, you will need to create a DNS ‘A’ record that can resolve the hostname ‘TCMGR’ to the IP of your Stratodesk virtual appliance. If you are using a Windows domain then a DNS server is likely to be in place. Creating a DNS ‘A’ record is straight forward and must be created on the DNS forward lookup zone.

You can test if this has been setup correctly by sending a ping request to TCMGR. If successful, this should resolve to the correctly assigned IP address of the Stratodesk virtual appliance.

If you are planning to either live boot or install over PXE then you will also need to create DHCP scope options. There are only two options that need to be configured here.

Option 66 – IP address of the virtual appliance

Option 67 – Boot filename, which will either be pxelinux.0 for legacy BIOS or x64/syslinux.efi for UEFI based systems.

We have created a comprehensive video on how to setup Stratodesk PXE which can be viewed here There are no other networking requirements.

NoTouch Center Configuration

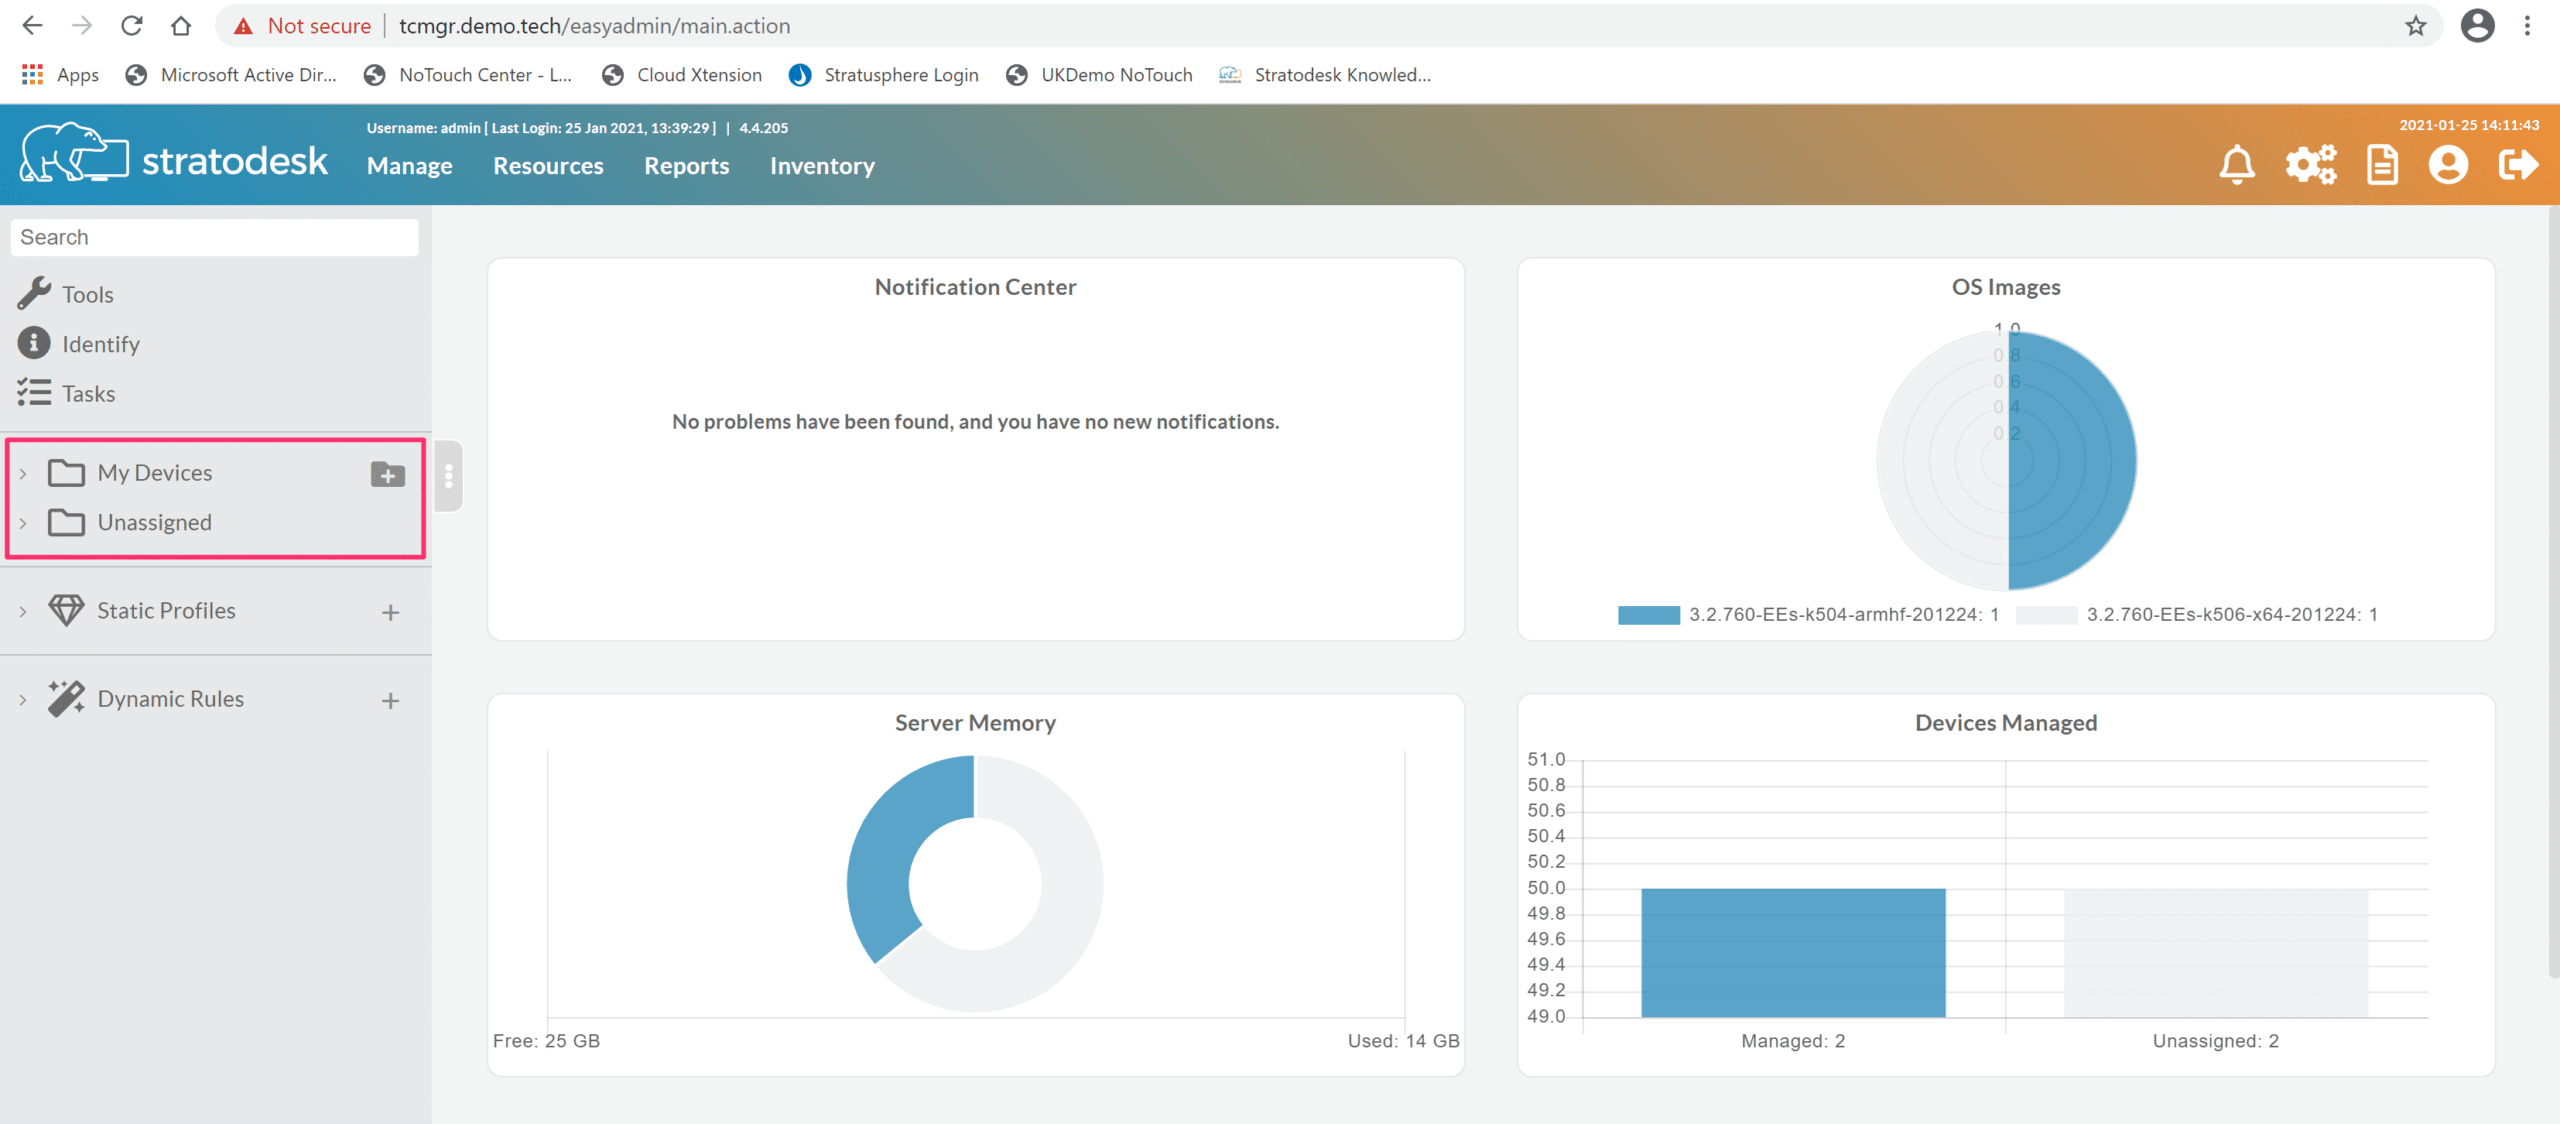
When you connect to Stratodesk NoTouch Center for the first time you will notice that only two folders exist in the devices tree. These are ‘My Clients’ & ‘Unassigned’

The way Stratodesk NoTouch Center manages endpoints is that they are put into and groups which have group settings that include things like keyboard layout & time zone to name but a few. In fact, as Stratodesk NoTouch is Linux based there are potentially hundreds of parameters that can be set. In reality though you will probably set around 10-15 or so as we already enable the optimum settings by default. Connections are also configured in the group settings.

Stratodesk NoTouch also supports group inheritance which means that you can have subgroups that inherit their settings from its parent group, which can also be changed to reflect endpoints that might be in different countries or time zones for example.

If no further configuration is made, then any device will automatically go into the unassigned group and will not receive its correct configuration until such time as its manually moved into the desired group.

How To Make Your Endpoints Truly “NoTouch”

Eliminate redundant maintenance tasks by making your endpoints truly “NoTouch”. You can do this by using ‘Automatic Assignment’ rules. Auto-assignment allows for full automation of a NoTouch endpoint rollout:

  • New clients will contact NoTouch Center using the usual methods such as the ‘TCMGR’ DNS host name
  • NoTouch Center will decide which group the client will be put into based on “Auto-assign” criteria
  • The clients will receive a configuration immediately afterwards

Technically speaking, whenever a new client announces itself to NoTouch Center for the first time, NoTouch Center will iterate through all groups and evaluate all criteria until a match is found.

Please note that auto-assignment is happening in the background, no matter whether someone is logged into NoTouch Center or not.

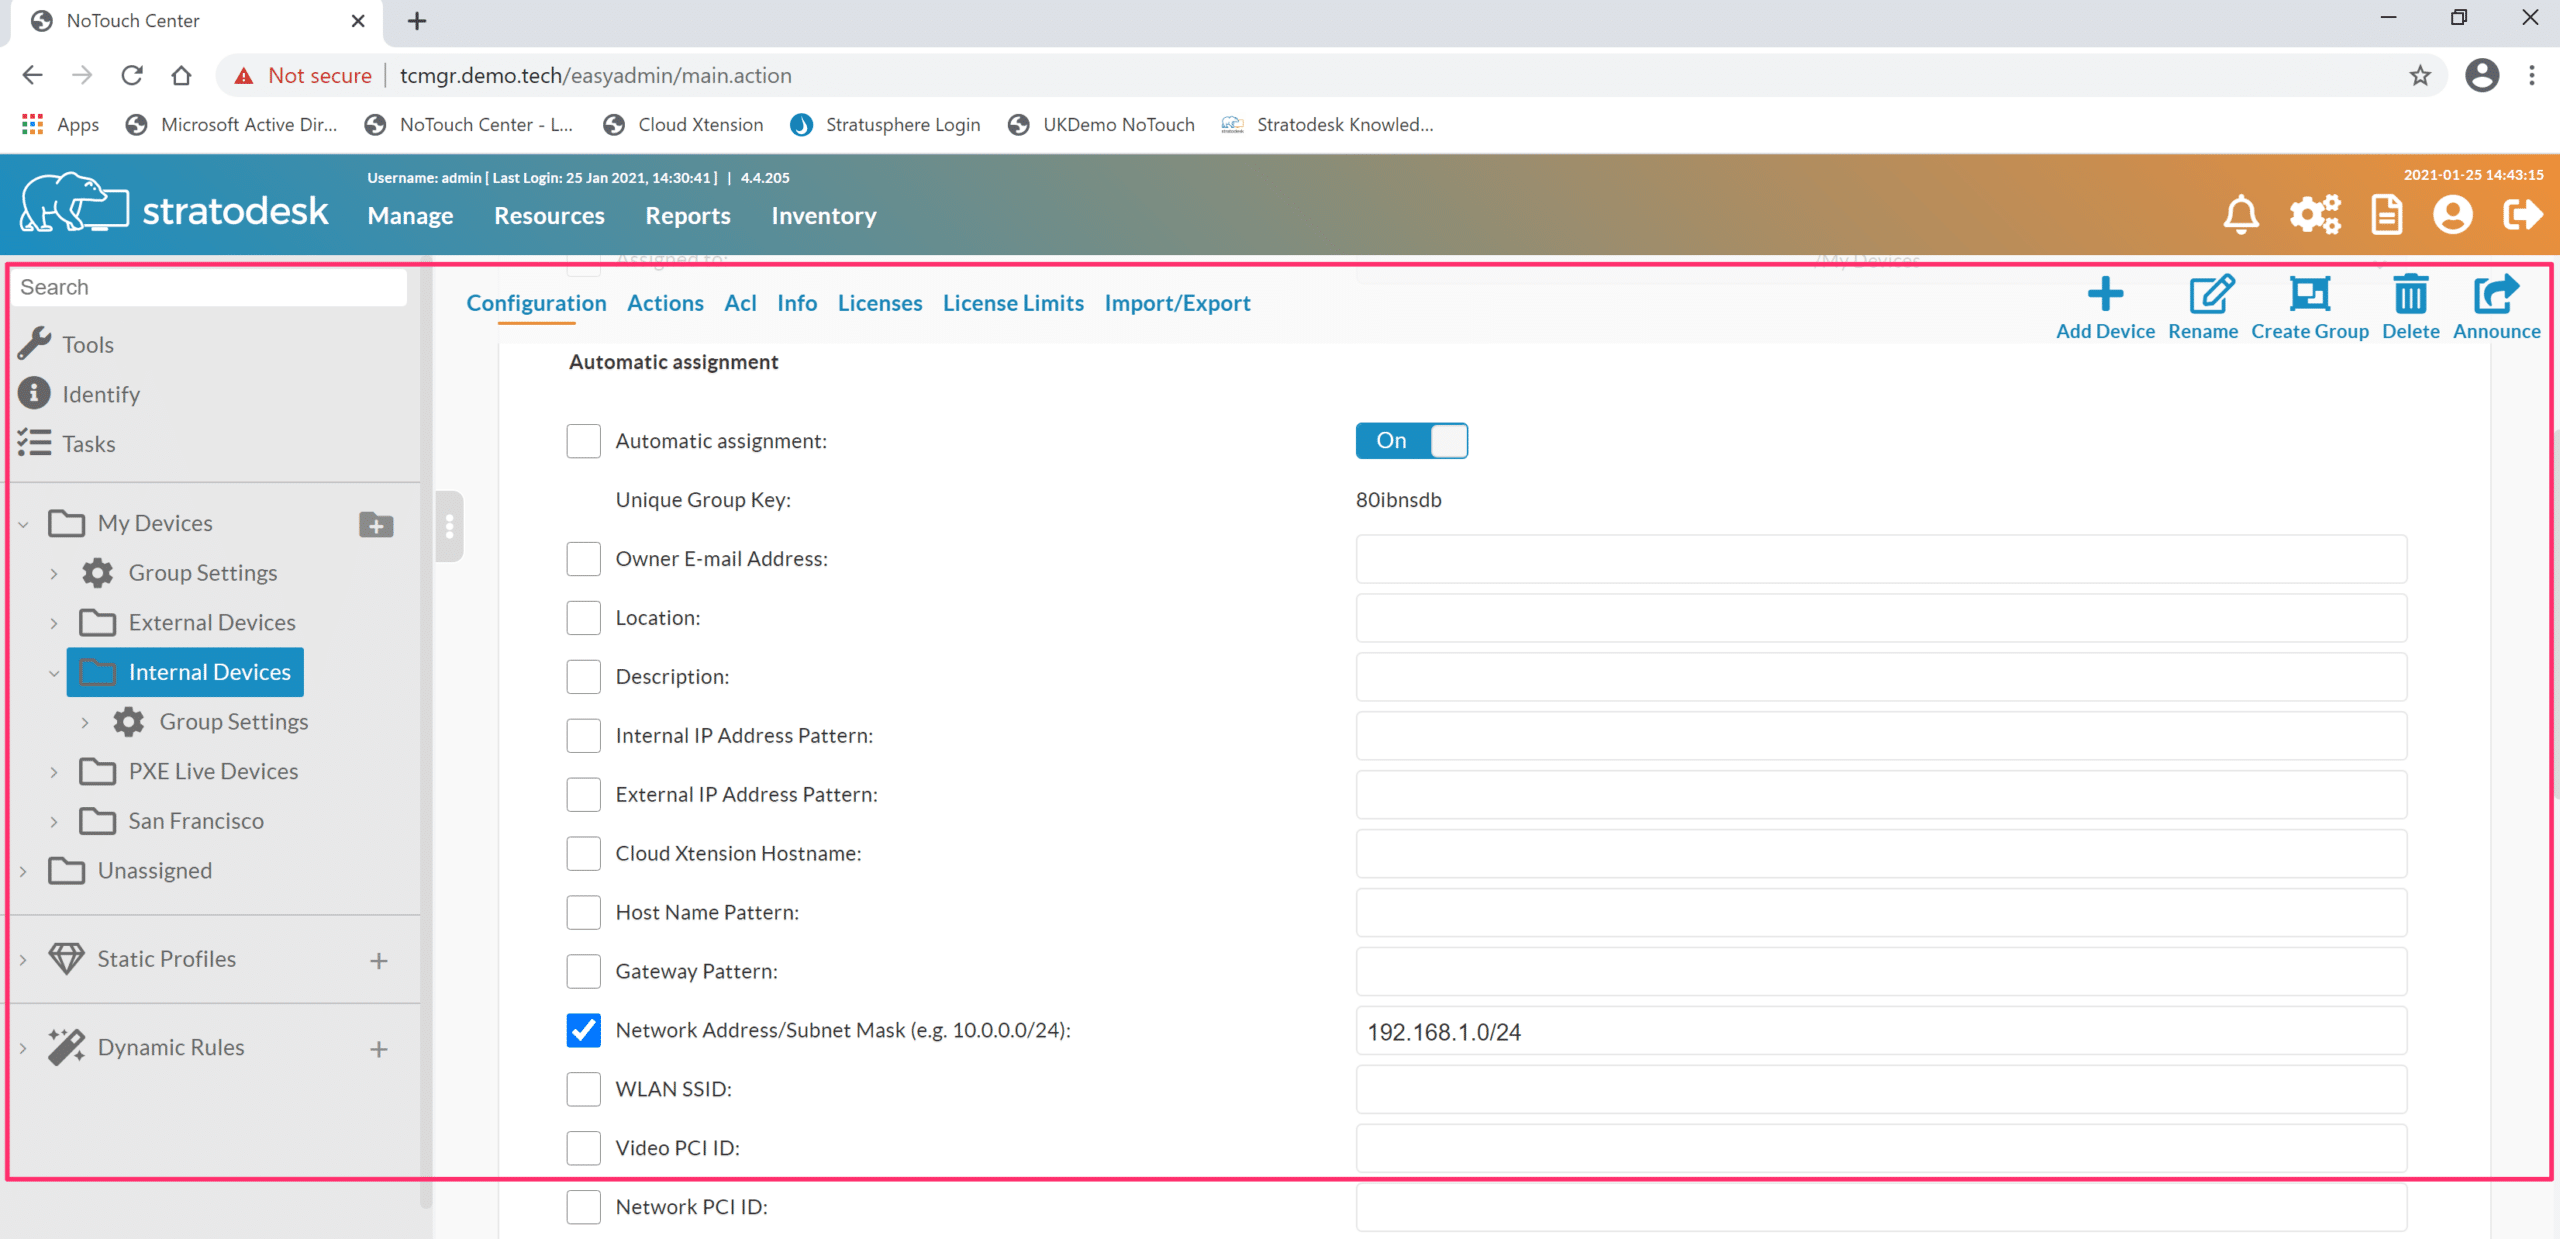
Auto-assignment is set on each group, and a number of different options exist including internal & external IP address patters, hostname patterns, or as shown below via Network Address/Subnet mask.

The video below shows an automated installation over PXE, with the device finding NoTouch Center using the method described above before being placed into the correct group using auto assignment ready for use by the end user.


As you can see, automating the installation of NoTouch OS to your endpoints is incredibly easy which means that you can deploy to hundreds or thousands of devices very quickly and Stratodesk NoTouch Desktop is, truly, “No Touch!”

author avatar
Paul Craddock

What is TCMGR and How do You Configure It?

What is TCMGR and How do You Configure It?

In my latest blog post, I’d like to explain the relevance of the term ‘TCMGR’. When configured correctly with auto assignment rules, TCMGR can greatly increase the level of automation when deploying Stratodesk NoTouch to your endpoints.

In short, TCMGR is the hostname of the Stratodesk virtual appliance and is an abbreviation of ‘Thin Client Manager’ which is used to manage Stratodesk NoTouch endpoints. It’s also the hostname that NoTouch endpoints are looking for during the first boot to find the management server. Once an endpoint has made contact with NoTouch Center, it will pick up its configuration & connection information that can then be used by the end user.

How to Configure TCMGR

Firstly, you will need to download the virtual appliance and import it into your hypervisor of choice. Stratodesk NoTouch Center currently supports Hyper-V, VMware ESXi/vCenter, Citrix Hypervisor (formally XenServer) & Nutanix AHV.

When importing the NoTouch Center virtual appliance into your environment, you have the option of using either DHCP or using a static IP address. It’s important that you use a static IP address to avoid future discovery issues in the event that the DHCP lease expires and its IP address changes.

Second, you will need to create a DNS ‘A’ record that can resolve the hostname ‘TCMGR’ to the IP of your Stratodesk virtual appliance. If you are using a Windows domain then a DNS server is likely to be in place. Creating a DNS ‘A’ record is straight forward and must be created on the DNS forward lookup zone.

You can test if this has been setup correctly by sending a ping request to TCMGR. If successful, this should resolve to the correctly assigned IP address of the Stratodesk virtual appliance.

If you are planning to either live boot or install over PXE then you will also need to create DHCP scope options. There are only two options that need to be configured here.

Option 66 – IP address of the virtual appliance

Option 67 – Boot filename, which will either be pxelinux.0 for legacy BIOS or x64/syslinux.efi for UEFI based systems.

We have created a comprehensive video on how to setup Stratodesk PXE which can be viewed here There are no other networking requirements.

NoTouch Center Configuration

When you connect to Stratodesk NoTouch Center for the first time you will notice that only two folders exist in the devices tree. These are ‘My Clients’ & ‘Unassigned’

The way Stratodesk NoTouch Center manages endpoints is that they are put into and groups which have group settings that include things like keyboard layout & time zone to name but a few. In fact, as Stratodesk NoTouch is Linux based there are potentially hundreds of parameters that can be set. In reality though you will probably set around 10-15 or so as we already enable the optimum settings by default. Connections are also configured in the group settings.

Stratodesk NoTouch also supports group inheritance which means that you can have subgroups that inherit their settings from its parent group, which can also be changed to reflect endpoints that might be in different countries or time zones for example.

If no further configuration is made, then any device will automatically go into the unassigned group and will not receive its correct configuration until such time as its manually moved into the desired group.

How To Make Your Endpoints Truly “NoTouch”

Eliminate redundant maintenance tasks by making your endpoints truly “NoTouch”. You can do this by using ‘Automatic Assignment’ rules. Auto-assignment allows for full automation of a NoTouch endpoint rollout:

  • New clients will contact NoTouch Center using the usual methods such as the ‘TCMGR’ DNS host name
  • NoTouch Center will decide which group the client will be put into based on “Auto-assign” criteria
  • The clients will receive a configuration immediately afterwards

Technically speaking, whenever a new client announces itself to NoTouch Center for the first time, NoTouch Center will iterate through all groups and evaluate all criteria until a match is found.

Please note that auto-assignment is happening in the background, no matter whether someone is logged into NoTouch Center or not.

Auto-assignment is set on each group, and a number of different options exist including internal & external IP address patters, hostname patterns, or as shown below via Network Address/Subnet mask.

The video below shows an automated installation over PXE, with the device finding NoTouch Center using the method described above before being placed into the correct group using auto assignment ready for use by the end user.


As you can see, automating the installation of NoTouch OS to your endpoints is incredibly easy which means that you can deploy to hundreds or thousands of devices very quickly and Stratodesk NoTouch Desktop is, truly, “No Touch!”
author avatar
Paul Craddock
Back To Top