Skip to content

Accelerate Your Windows 11 Migration with Stratodesk NoTouch
Learn More

How Stratodesk Software Works from a Helpdesk Perspective

Blog post by Paul Craddock, Stratodesk Sales Engineer.

When we talk about Stratodesk NoTouch Center, we often talk about how to manage endpoints, by putting them into groups, configuring group settings & connections etc but in my latest blog post I’d like to cover what NoTouch Center might look from a helpdesk perspective, and in particular helpdesk users.

This is going to be a long read, so you might want to grab a beverage of choice before you start reading. Some of the points I’ll be covering will include how to create local user groups, and assign rights to those groups, creating local user accounts, including assigning rights to groups so that you can restrict which groups are visible to helpdesk users. Remote shadowing, web access, identify (raise hand) and more.

I’ll then go on to show some of the tools that are built into NoTouch Software which will make it easier for you to troubleshoot issues that are raised by end users like the identify & screen shadowing functions.

How can my helpdesk users authenticate with NoTouch Center?

LDAP query

This can be done in a couple of different ways. One way is to create and LDAP query, so firstly, go to configuration and scroll down to authentication. Then select LDAP as the authentication module, and then fill in the correct parameters for your Active Directory environment as shown below.

Your environment is, likely to be configured differently but we have created a dedicated feature for this which is available on our website on the following link.
Helpdesk blog

Create Local Users

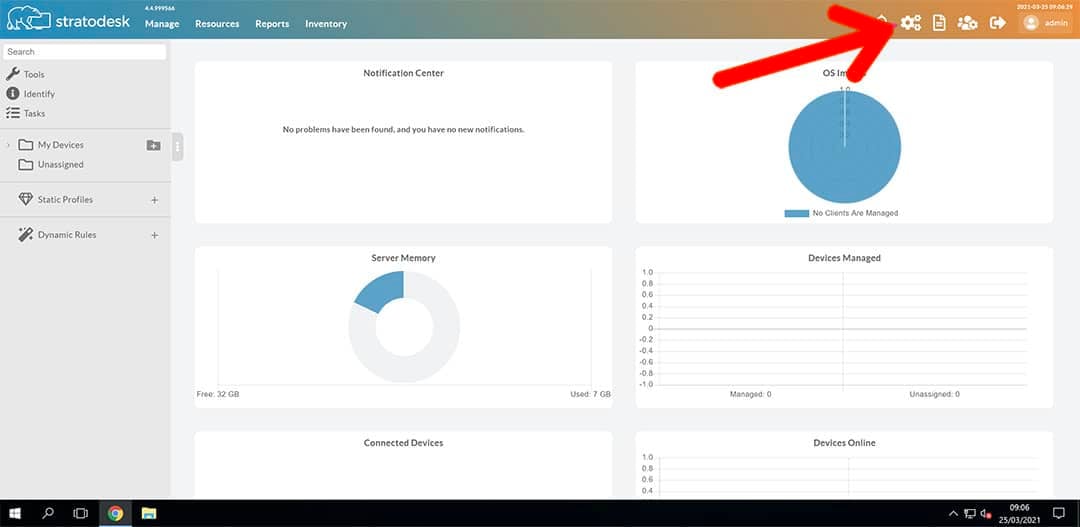
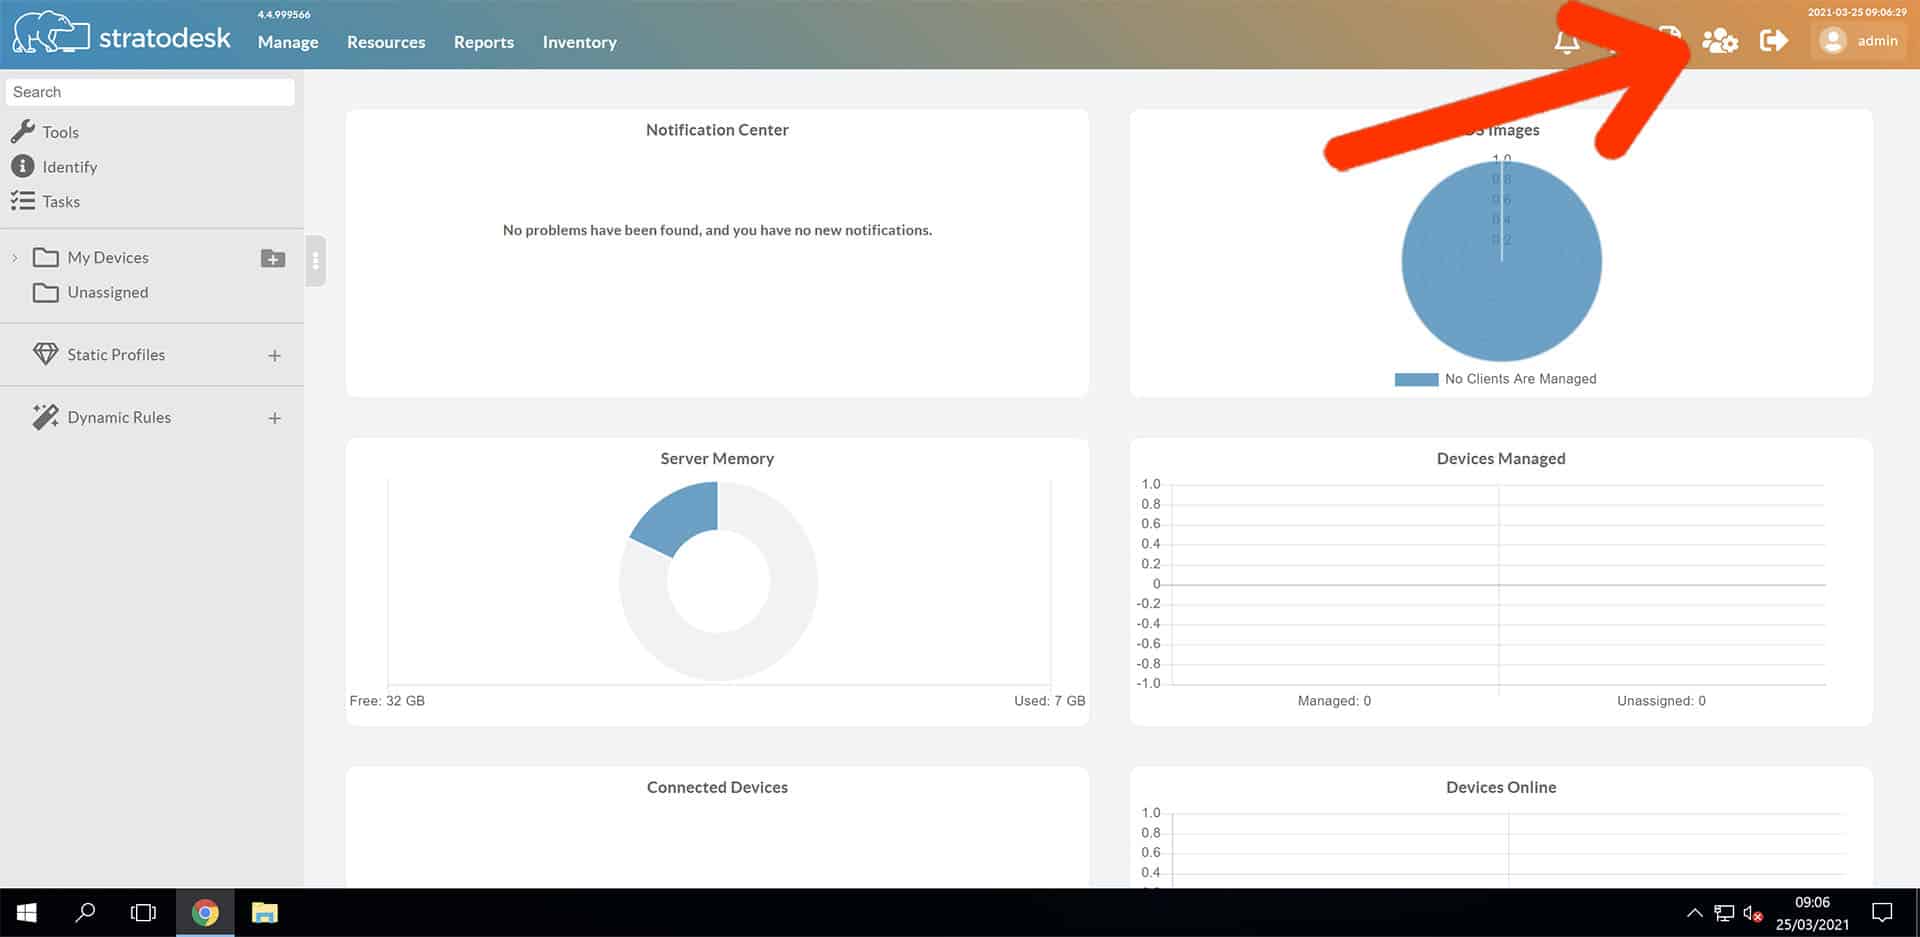
Another option is to create local users, and this has changed significantly with NoTouch Center 4.5. To do this click the ‘User’ icon in NoTouch Center.

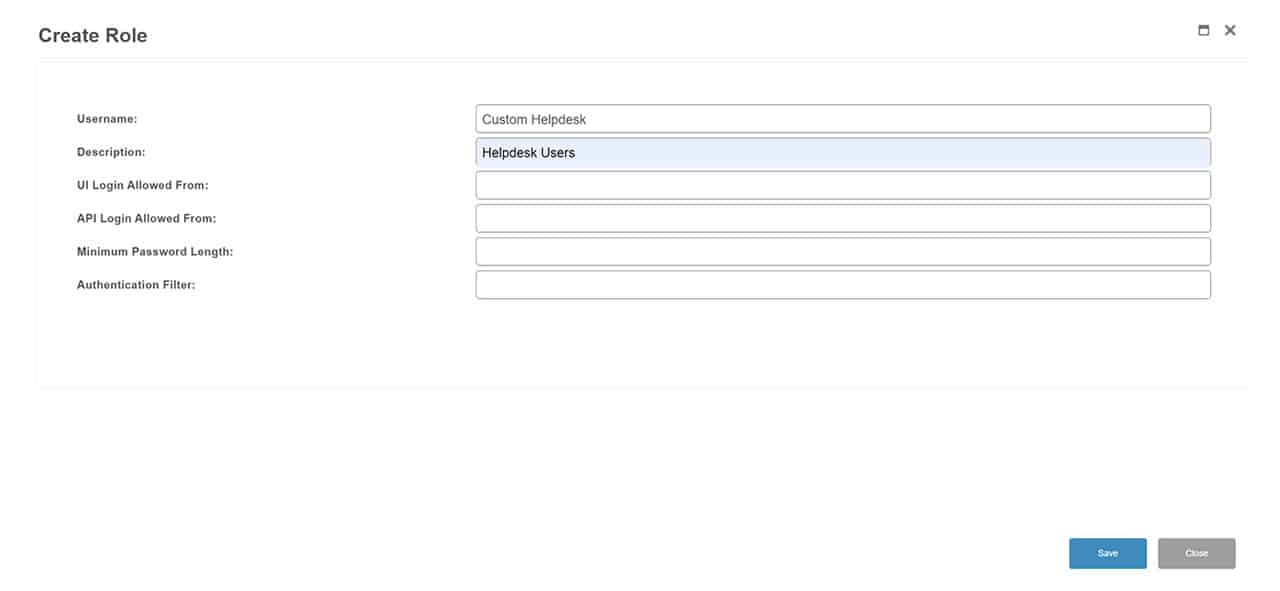
From here click ‘Create Role’ and give the role a name and a description and then click save. There are also additional options that can restrict the sites the that are allowed to access both the UI & API and also apply minimum password length and authentication filter.
Helpdesk blog

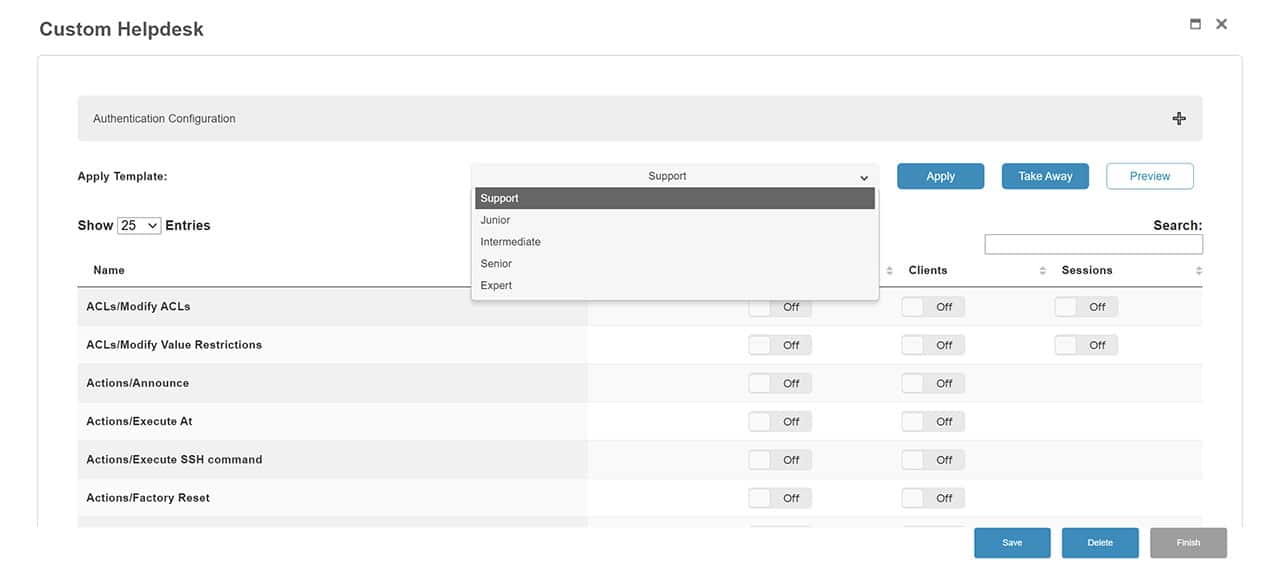
Next apply a template based on assumed support roles. Select the template you’d want to choose and click apply. Please note that these temples are a guide, and should you wish to customise the roles in the template then you can obviously do this.

In this case the support template has been applied, and there’s also an option to preview this as the examples below show. 
helpdesk blog

Help desk blog

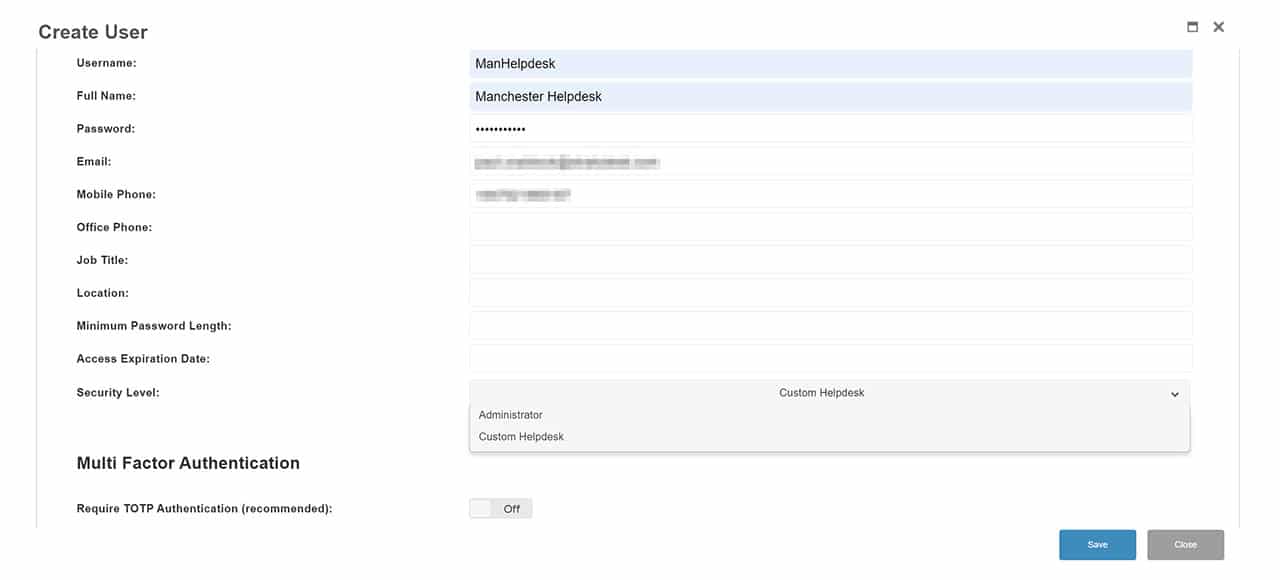
To create a user, select the ‘Create User’ option. On the user creation screen you will need to at least include username & full name & security level which includes roles that have been created. If you wish to configure multi-factor authentication (MFA) or restrict sites from where NoTouch Center can be accessed, then these can also be configured.

Once all the parameters have been set, simply click ‘Save’ & ‘Close’ to complete the user creation process.

helpdesk blog

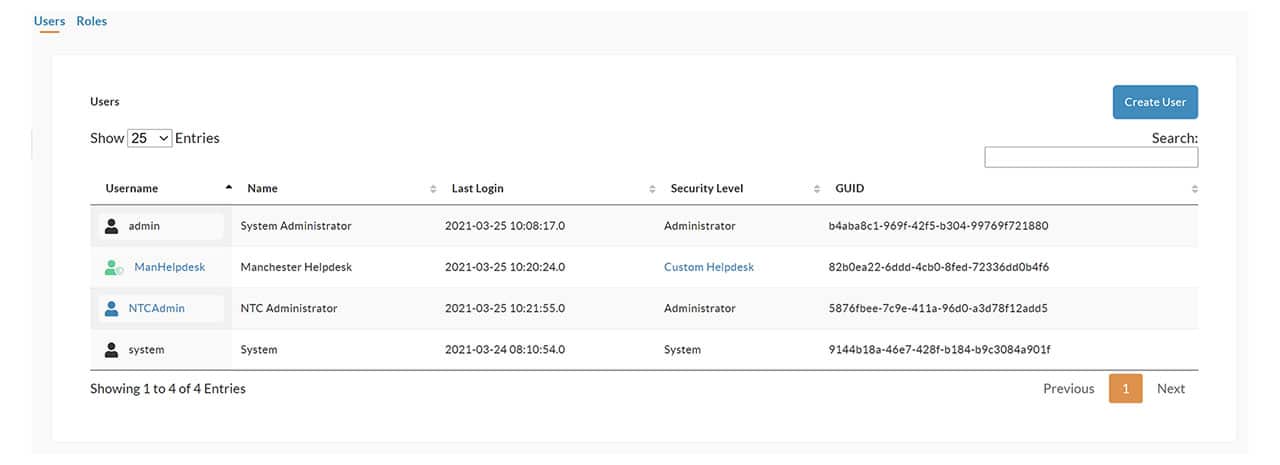
User accounts that have been automatically created by NoTouch Center appear black, and non-default user accounts will appear blue, but those user accounts with multi-factor authentication will appear as green with a shield.

Helpdesk Blog

Identify

Identify is a unique feature of Stratodesk NoTouch software that lets the end-users identify themselves (or their endpoint) to the administrator using NoTouch Center. This is easily achieved when the end-users press the hotkey combination ctrl+alt+i in NoTouch OS. This sends an identification request to NoTouch Center that is presented as a notification in the bottom right corner.

If you then click the hostname in the main section of the screen, it will take you directly to the device and the group in which it sits. I can see its configuration in full, including firmware version and more.

How can I see what the user is seeing?

Shadowing

For this purpose, we recommend the use HTML5 screen shadowing feature used in NoTouch software via NoVNC which is configured as a service.  HTML5 Screen Shadowing will allow you to shadow devices on the corporate network, and any device outside the corporate network in you are using either the Stratodesk Cloud Xtension or Stratodesk NoTouch Cloud. Once the shadowing prerequisites have been met you can shadow a user’s session by selecting the screen shadowing function.

If you’d like to understand how to set up Shadowing, please review the following kb article which can be viewed here.

If you have set a screen shadowing password, then you will need to enter this. Likewise, if you have set the <Screen Shadowing | Ask User at New Connection> parameter, then the user will have to accept the incoming shadowing request first as this is a security feature to prevent unauthorised shadowing. Once all these conditions have been met, then you will be able to shadow the user’s desktop which includes both NoTouch OS and virtual desktop environments. 

If you receive any SSL errors when trying to connect, then this is perfectly normal even if your NoTouch Center environment has a valid SSL certificate. This is because you are connecting from a potentially secure NoTouch Center environment to a device that does not have a machine certificate.

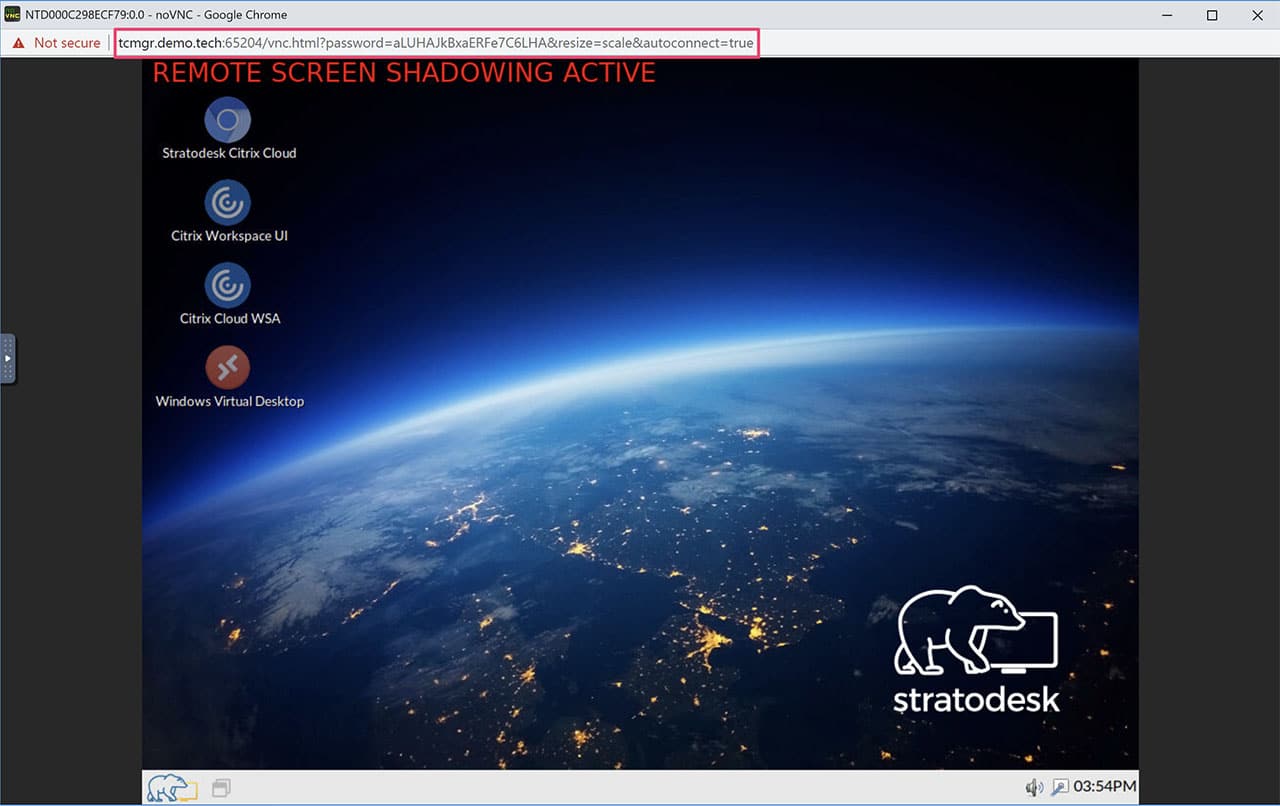
Once the NoVNC session is active you will notice that it connects using one-time ports & passwords. It also displays a warning message on the users screen to let them know their session is being shadowed, and again is another security feature.

Web Access

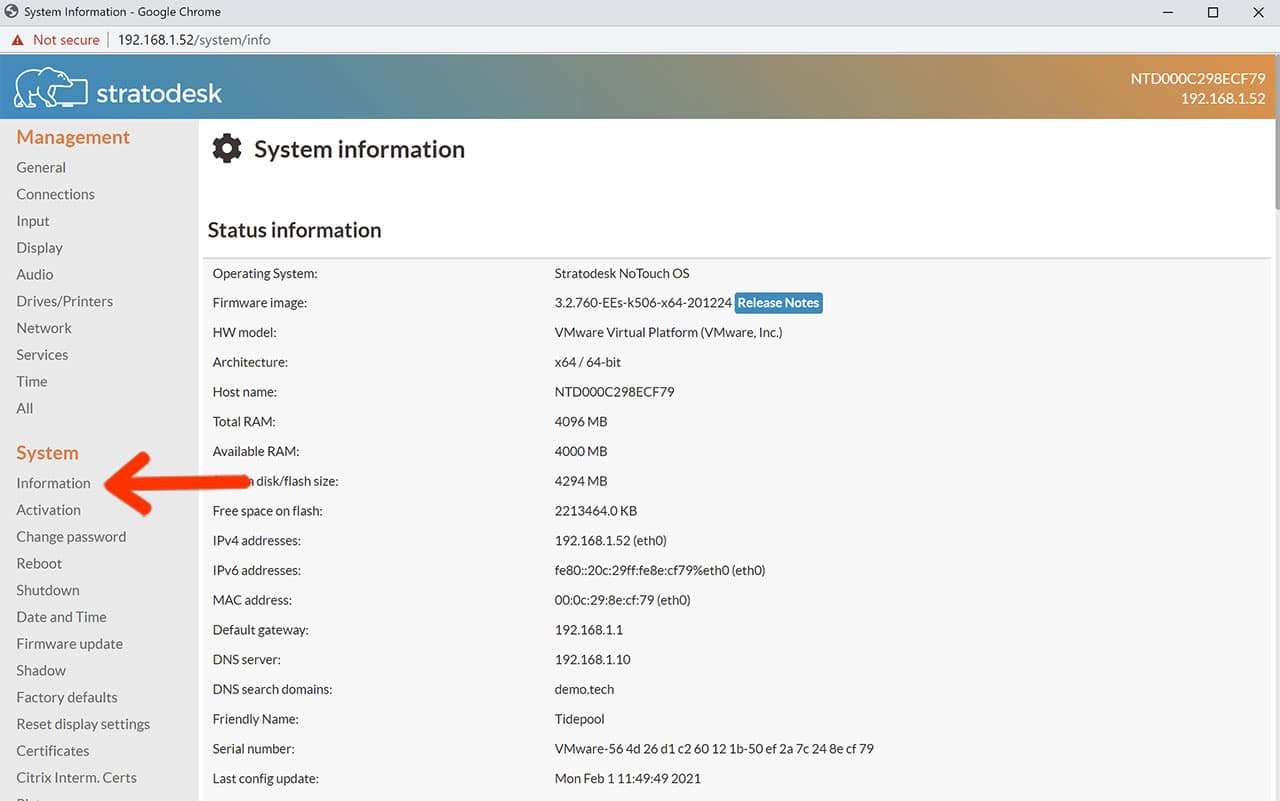
Web Access provides another way of accessing or changing the device configuration and is displayed in the same way as if you were viewing this directly on the endpoint running NoTouch OS. You can access this in one of two ways by either typing the IP address of the endpoint into a browser window, or directly from NoTouch Center as shown below.

help desk blog

Just like with screen shadowing if you receive and SSL errors, it’s okay to proceed. Once you are connected, you can login with your preferred administrator password. Once authenticated you can see and or change the detailed configuration including system information.

If you scroll down further, you can see the announce status of the device, and this is often a good place to check if you think that devices are not getting their configuration correctly as this includes a time stamp.

If you ever wanted to know which version of a client is installed or being used, then this information is also available.

Screenshot

Easily capture a screenshot of any endpoint from NoTouch Center by right-clicking over an endpoint from the endpoints’ tree on the left hand side. The end-user will be notified a screenshot has been taken. For privacy reasons you might need to enable the screenshot service.

This is a newer feature of NoTouch software, and for this to work you need to have your NoTouch OS 3.3 or above and NoTouch Center 4.5 or newer.

How do I display System Information like IP Address & Hostname, etc?

Many system administrators will be familiar with the bginfo tool from Microsoft which is displayed on the desktop and gives the user easy access to information like hostname & IP address which they could provide during a support call and in turn administrators would use tools like VNC or TeamViewer to then connect to that machine remotely assuming it had network access.

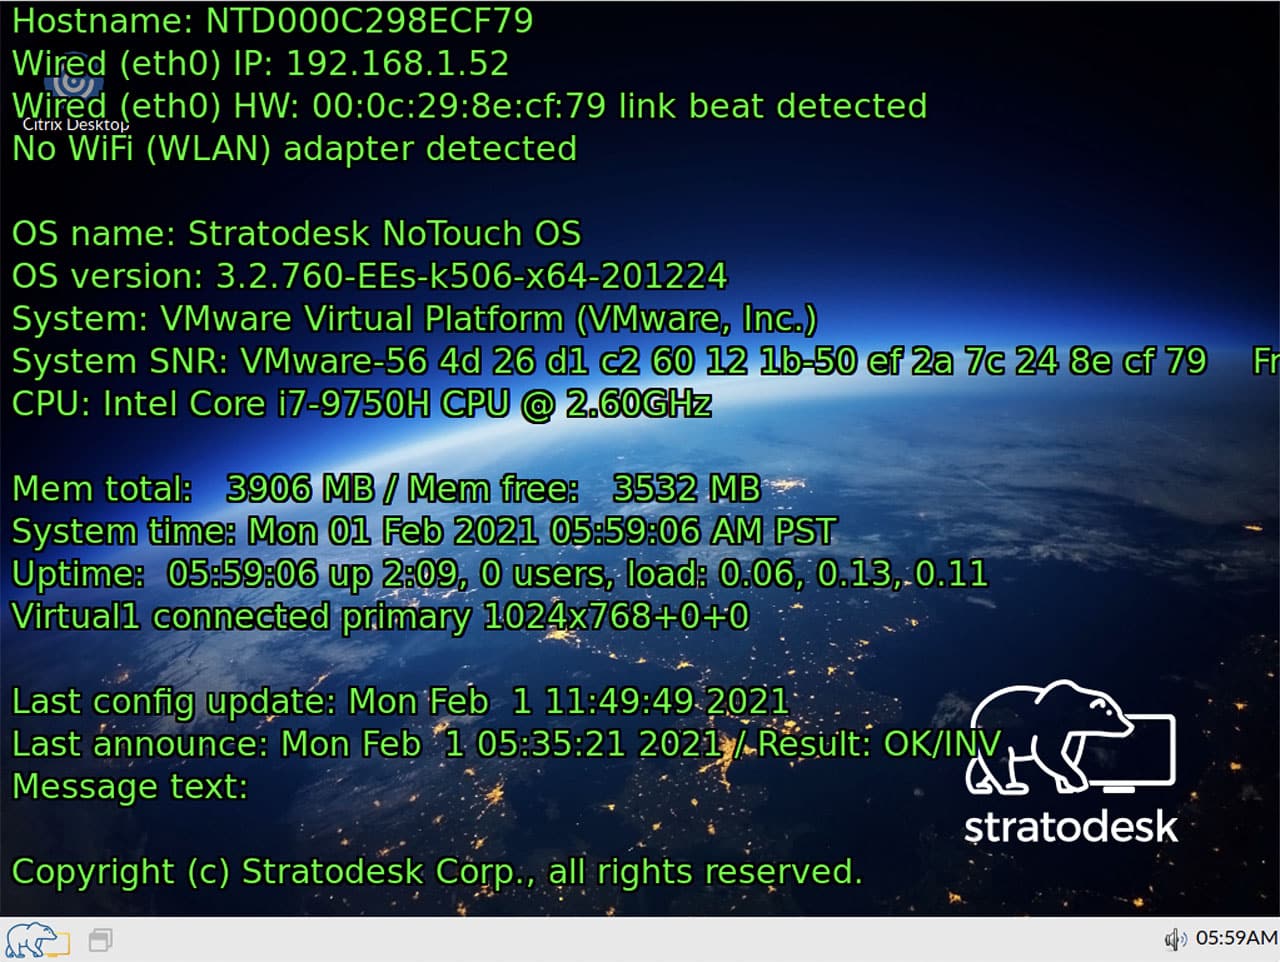
As Stratodesk NoTouch OS is Linux based, the bginfo tool won’t work, but we do have another option which we call the Sysadmin’s best friend and is a predefined hotkey of ctrl+alt+s and more information can be found in the following kb

This displays the same information such as IP Address, hostname and firmware version.

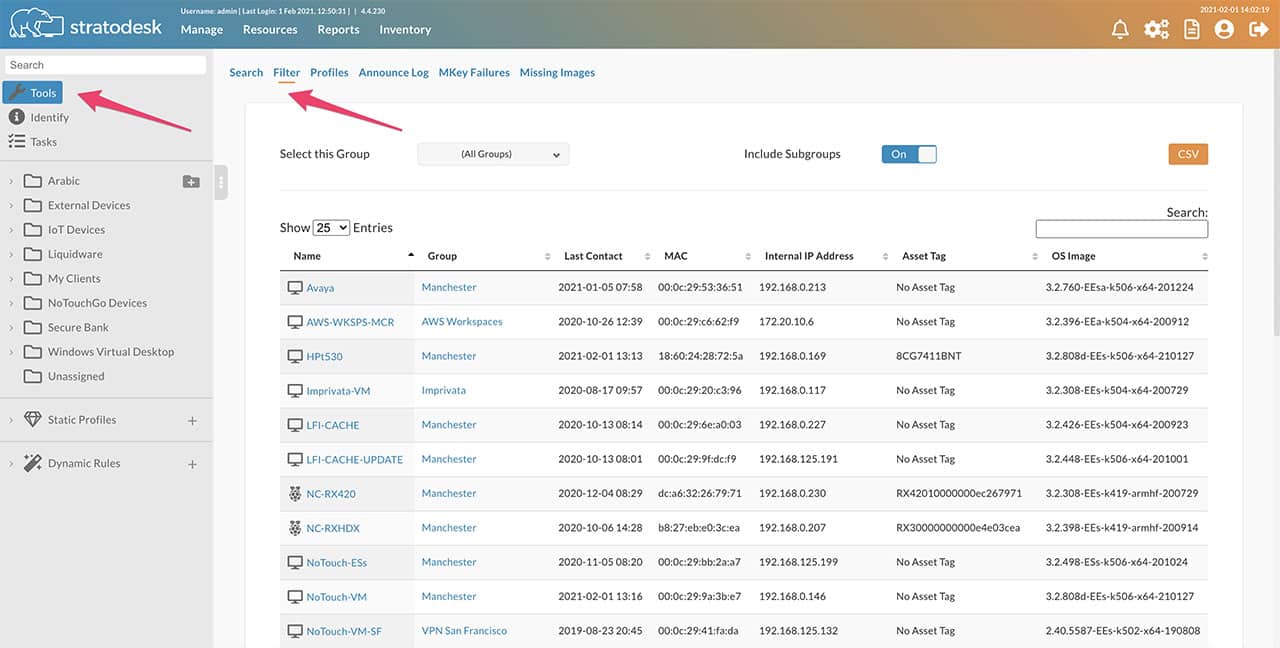
Armed with this information you could then go to Tools/Filter and then type in the IP address or hostname of the device to eventually find it, but again this takes time and there is an even easier way of finding 1 device amongst the hundreds or even thousands of devices that NoTouch Center can manage using the Identify function.

helpdesk blog

Other Tips & Tricks

Allow User Parameters

If you see any parameters in NoTouch Center that start with ‘Allow User’ this means the user can configure this parameter without needing access to the local configuration which is password protected. It goes without saying that these need to be enabled in the first instance, but these settings can apply to display, audio & input parameters to name but a few.

Please note that some settings may require a reboot for the changes to take effect.

Licence Limits

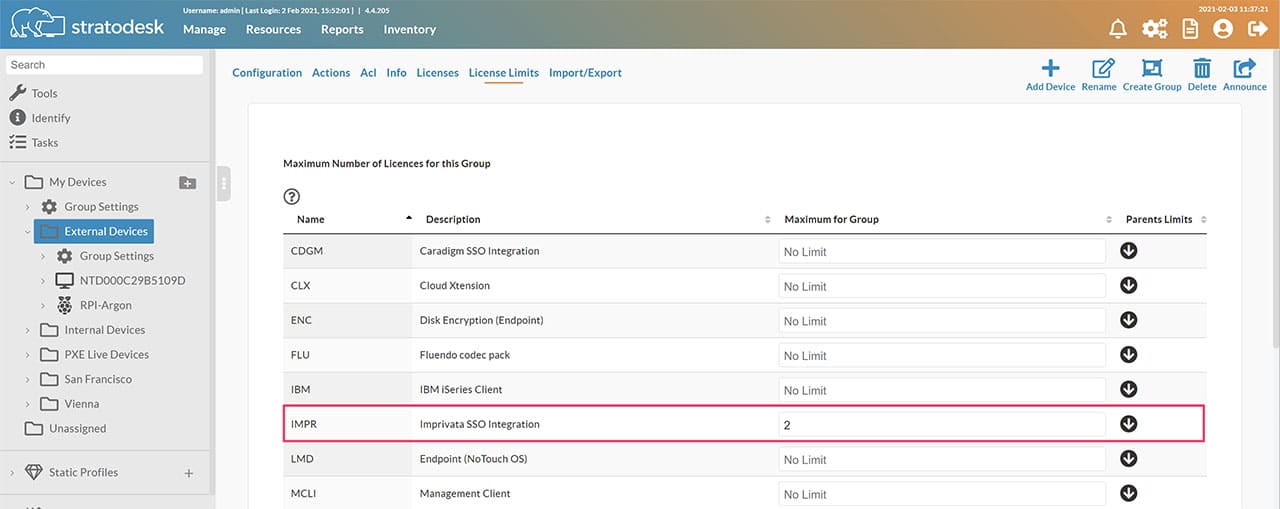
Licence Limits is an easy way to control the number of premium addon licences at a group level without the need to apply licences directly to a device.

Firstly, you need to have sufficient licences available and can be viewed in ‘Resources/Licences’

Then select the group you want to add the licence limits to add the upper limit of licences you wish to add. The example below shows that 2 Imprivata licences have been added to the ‘External Devices’ group. As there are only two devices in the group that will work perfectly. However, please note at if other devices are added to the group, they will not be allocated a licence until the licence limit has been increased.

Firmware Updates on Low-Speed Networks

When updating firmware on low-speed networks then there are some options available and these have been covered previously in my technical blogs, but I’ve included these as a reminder below.

Cascading Updates

Firmware Update Limits

How can I troubleshoot issues?

From a diagnostic perspective we include a number of tools from the Diagnostic/Debug menu. These are categorised and will provide useful information when trying to troubleshoot issues relating to networking, audio & attached USB devices etc.

Support File

If there is an issue that you are unable to resolve and need further assistance from Stratodesk, then you can of course email support directly for help. Depending on the issue you report to us, then we might be able to solve this quickly without the need for further information. In the event that further information is needed, we have a tool for the which is called a support file, there’s a detailed kb (Knowledge Base) for this here.

The support file is an archive containing a copy of the device configuration, hardware analysis including USB devices, system processes and log files. Please don’t worry about password information being shared as this information is replaced with random words & characters so is like an x-ray of your configuration. However, it does take the guess work out of trying to work out your device configuration, and the errors that are being presented which means that we can resolve customers issues more quickly. 

Support File – Update in NoTouch Center 4.5

Starting with the new NoTouch OS 3.3 and NoTouch Center 4.5, similar to the screenshot feature, you can easily obtain an endpoint’s support file by right-clicking over an endpoint from the endpoints tree branch inside a group and then by selecting “Support File”. A notification will appear for the downloaded support file.

Download Stratodesk NoTouch Free Trial today and try it on your own!

author avatar
Paul Craddock

How Stratodesk Software Works from a Helpdesk Perspective

Blog post by Paul Craddock, Stratodesk Sales Engineer.

When we talk about Stratodesk NoTouch Center, we often talk about how to manage endpoints, by putting them into groups, configuring group settings & connections etc but in my latest blog post I’d like to cover what NoTouch Center might look from a helpdesk perspective, and in particular helpdesk users.

This is going to be a long read, so you might want to grab a beverage of choice before you start reading. Some of the points I’ll be covering will include how to create local user groups, and assign rights to those groups, creating local user accounts, including assigning rights to groups so that you can restrict which groups are visible to helpdesk users. Remote shadowing, web access, identify (raise hand) and more.

I’ll then go on to show some of the tools that are built into NoTouch Software which will make it easier for you to troubleshoot issues that are raised by end users like the identify & screen shadowing functions.

How can my helpdesk users authenticate with NoTouch Center?

LDAP query

This can be done in a couple of different ways. One way is to create and LDAP query, so firstly, go to configuration and scroll down to authentication. Then select LDAP as the authentication module, and then fill in the correct parameters for your Active Directory environment as shown below.

Your environment is, likely to be configured differently but we have created a dedicated feature for this which is available on our website on the following link.

Helpdesk blog

Create Local Users

Another option is to create local users, and this has changed significantly with NoTouch Center 4.5. To do this click the ‘User’ icon in NoTouch Center.

From here click ‘Create Role’ and give the role a name and a description and then click save. There are also additional options that can restrict the sites the that are allowed to access both the UI & API and also apply minimum password length and authentication filter.

Helpdesk blog

Next apply a template based on assumed support roles. Select the template you’d want to choose and click apply. Please note that these temples are a guide, and should you wish to customise the roles in the template then you can obviously do this.

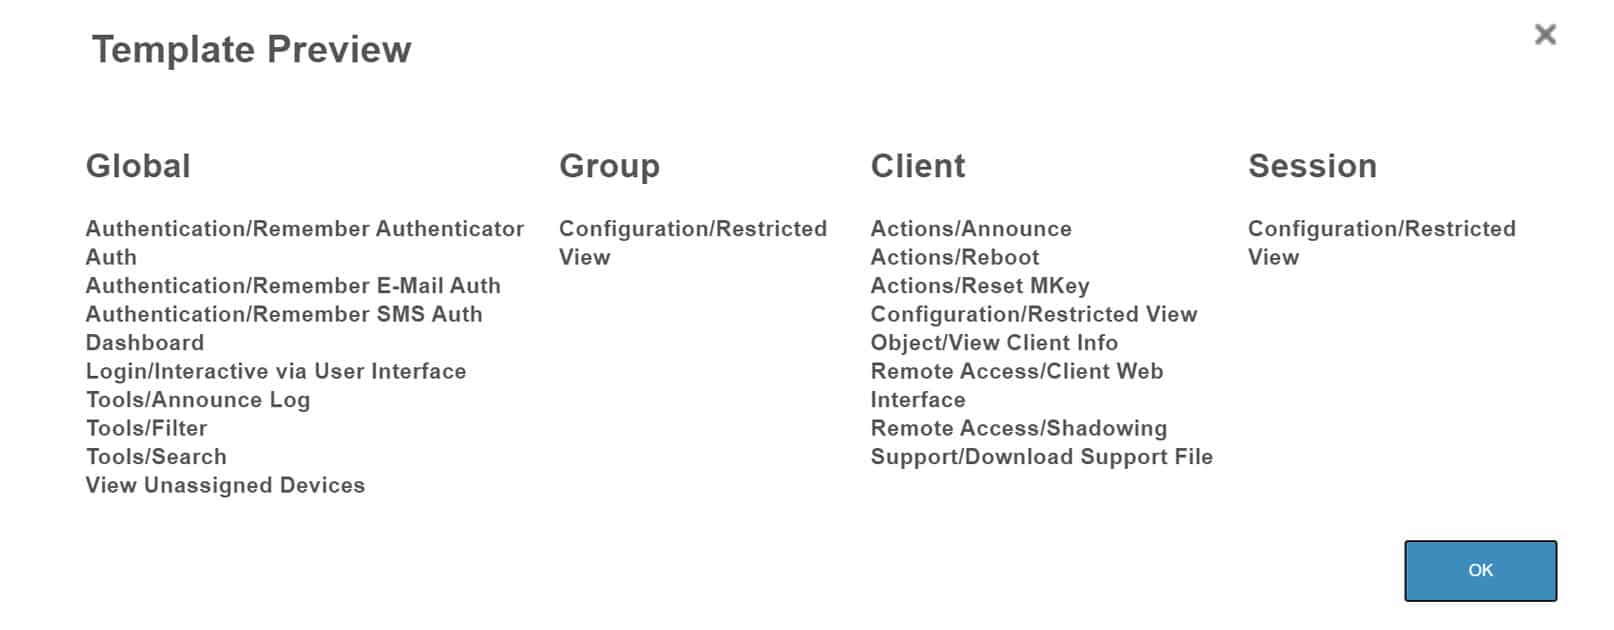
In this case the support template has been applied, and there’s also an option to preview this as the examples below show. 
helpdesk blog

Help desk blog

To create a user, select the ‘Create User’ option. On the user creation screen you will need to at least include username & full name & security level which includes roles that have been created. If you wish to configure multi-factor authentication (MFA) or restrict sites from where NoTouch Center can be accessed, then these can also be configured.

Once all the parameters have been set, simply click ‘Save’ & ‘Close’ to complete the user creation process.
helpdesk blog

User accounts that have been automatically created by NoTouch Center appear black, and non-default user accounts will appear blue, but those user accounts with multi-factor authentication will appear as green with a shield.
Helpdesk Blog

Identify

Identify is a unique feature of Stratodesk NoTouch software that lets the end-users identify themselves (or their endpoint) to the administrator using NoTouch Center. This is easily achieved when the end-users press the hotkey combination ctrl+alt+i in NoTouch OS. This sends an identification request to NoTouch Center that is presented as a notification in the bottom right corner.

If you then click the hostname in the main section of the screen, it will take you directly to the device and the group in which it sits. I can see its configuration in full, including firmware version and more.

How can I see what the user is seeing?

Shadowing

For this purpose, we recommend the use HTML5 screen shadowing feature used in NoTouch software via NoVNC which is configured as a service.  HTML5 Screen Shadowing will allow you to shadow devices on the corporate network, and any device outside the corporate network in you are using either the Stratodesk Cloud Xtension or Stratodesk NoTouch Cloud. Once the shadowing prerequisites have been met you can shadow a user’s session by selecting the screen shadowing function.

If you’d like to understand how to set up Shadowing, please review the following kb article which can be viewed here.

If you have set a screen shadowing password, then you will need to enter this. Likewise, if you have set the <Screen Shadowing | Ask User at New Connection> parameter, then the user will have to accept the incoming shadowing request first as this is a security feature to prevent unauthorised shadowing. Once all these conditions have been met, then you will be able to shadow the user’s desktop which includes both NoTouch OS and virtual desktop environments. 

If you receive any SSL errors when trying to connect, then this is perfectly normal even if your NoTouch Center environment has a valid SSL certificate. This is because you are connecting from a potentially secure NoTouch Center environment to a device that does not have a machine certificate.

Once the NoVNC session is active you will notice that it connects using one-time ports & passwords. It also displays a warning message on the users screen to let them know their session is being shadowed, and again is another security feature.
Web Access

Web Access provides another way of accessing or changing the device configuration and is displayed in the same way as if you were viewing this directly on the endpoint running NoTouch OS. You can access this in one of two ways by either typing the IP address of the endpoint into a browser window, or directly from NoTouch Center as shown below.

help desk blog

Just like with screen shadowing if you receive and SSL errors, it’s okay to proceed. Once you are connected, you can login with your preferred administrator password. Once authenticated you can see and or change the detailed configuration including system information.

If you scroll down further, you can see the announce status of the device, and this is often a good place to check if you think that devices are not getting their configuration correctly as this includes a time stamp.

If you ever wanted to know which version of a client is installed or being used, then this information is also available.
Screenshot

Easily capture a screenshot of any endpoint from NoTouch Center by right-clicking over an endpoint from the endpoints’ tree on the left hand side. The end-user will be notified a screenshot has been taken. For privacy reasons you might need to enable the screenshot service.

This is a newer feature of NoTouch software, and for this to work you need to have your NoTouch OS 3.3 or above and NoTouch Center 4.5 or newer.

How do I display System Information like IP Address & Hostname, etc?

Many system administrators will be familiar with the bginfo tool from Microsoft which is displayed on the desktop and gives the user easy access to information like hostname & IP address which they could provide during a support call and in turn administrators would use tools like VNC or TeamViewer to then connect to that machine remotely assuming it had network access.

As Stratodesk NoTouch OS is Linux based, the bginfo tool won’t work, but we do have another option which we call the Sysadmin’s best friend and is a predefined hotkey of ctrl+alt+s and more information can be found in the following kb

This displays the same information such as IP Address, hostname and firmware version.
Armed with this information you could then go to Tools/Filter and then type in the IP address or hostname of the device to eventually find it, but again this takes time and there is an even easier way of finding 1 device amongst the hundreds or even thousands of devices that NoTouch Center can manage using the Identify function.
helpdesk blog

Other Tips & Tricks

Allow User Parameters

If you see any parameters in NoTouch Center that start with ‘Allow User’ this means the user can configure this parameter without needing access to the local configuration which is password protected. It goes without saying that these need to be enabled in the first instance, but these settings can apply to display, audio & input parameters to name but a few.

Please note that some settings may require a reboot for the changes to take effect.

Licence Limits

Licence Limits is an easy way to control the number of premium addon licences at a group level without the need to apply licences directly to a device.

Firstly, you need to have sufficient licences available and can be viewed in ‘Resources/Licences’

Then select the group you want to add the licence limits to add the upper limit of licences you wish to add. The example below shows that 2 Imprivata licences have been added to the ‘External Devices’ group. As there are only two devices in the group that will work perfectly. However, please note at if other devices are added to the group, they will not be allocated a licence until the licence limit has been increased.
Firmware Updates on Low-Speed Networks

When updating firmware on low-speed networks then there are some options available and these have been covered previously in my technical blogs, but I’ve included these as a reminder below.

Cascading Updates

Firmware Update Limits

How can I troubleshoot issues?

From a diagnostic perspective we include a number of tools from the Diagnostic/Debug menu. These are categorised and will provide useful information when trying to troubleshoot issues relating to networking, audio & attached USB devices etc.

Support File

If there is an issue that you are unable to resolve and need further assistance from Stratodesk, then you can of course email support directly for help. Depending on the issue you report to us, then we might be able to solve this quickly without the need for further information. In the event that further information is needed, we have a tool for the which is called a support file, there’s a detailed kb (Knowledge Base) for this here.

The support file is an archive containing a copy of the device configuration, hardware analysis including USB devices, system processes and log files. Please don’t worry about password information being shared as this information is replaced with random words & characters so is like an x-ray of your configuration. However, it does take the guess work out of trying to work out your device configuration, and the errors that are being presented which means that we can resolve customers issues more quickly. 

Support File – Update in NoTouch Center 4.5

Starting with the new NoTouch OS 3.3 and NoTouch Center 4.5, similar to the screenshot feature, you can easily obtain an endpoint’s support file by right-clicking over an endpoint from the endpoints tree branch inside a group and then by selecting “Support File”. A notification will appear for the downloaded support file.

Download Stratodesk NoTouch Free Trial today and try it on your own!

author avatar
Paul Craddock
Back To Top